

Error:
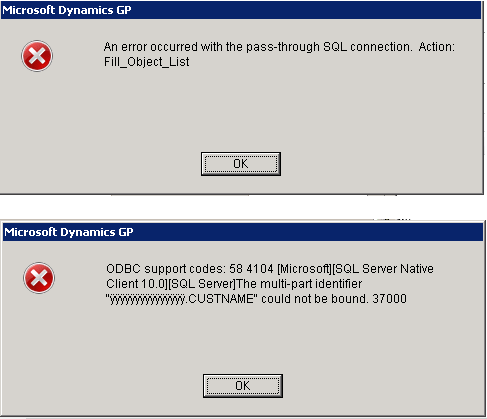
When using SmartFill in the Address ID field, you receive the following error message.
An error occurred with the pass-through SQL connection. Action:Fill_Object_List
Cause:
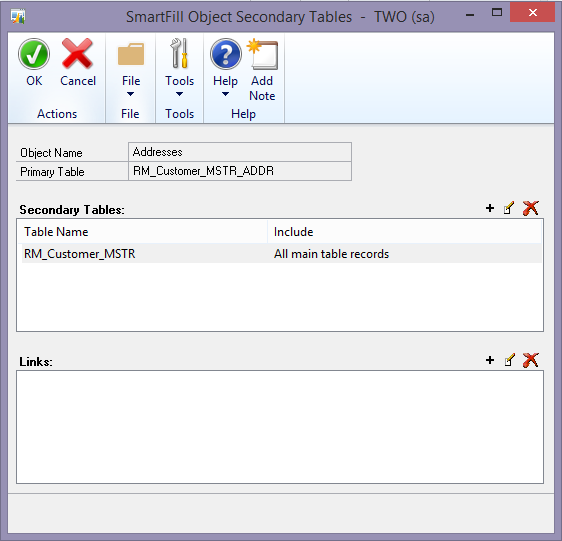
1. There is a link missing in the Secondary Table setup of the Address Object.
2. There are two objects with the same field lookup in the Repository.
3. Mapping was used but the mapping entries are missing.
Recommendations:
Resolution 1: Correct the missing link.
1. Log into Dynamics GP as ‘sa’.
2. Go to Tools | Setup | SmartFill | Objects.
3. Double-click the Addresses Object to open the SmartFill Object Maintenance
Details window.
4. Review the existing fields to see if they come from a Secondary Table.
5. Click on the blue expansion arrow next to the Table Name field to open the
SmartFill Object Secondary Tables window.
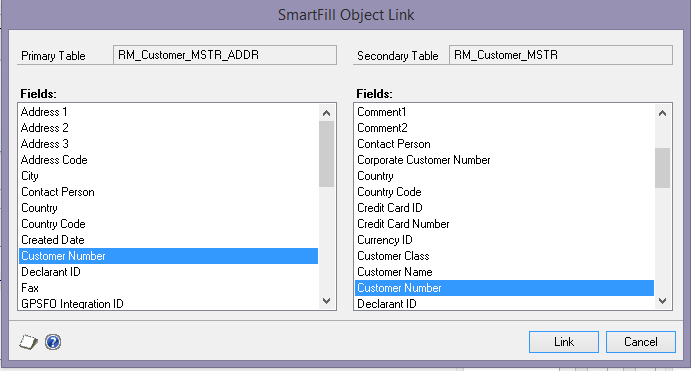
5. Select the correct Product and Series pertaining to your Object and then select
the needed table to open the SmartFill Object Link window.
6. Under the Primary Table Field section, select the field you wish to link. In this
example it is Customer Number.
7. Under the Secondary Table Field section, select the field you are linking, such as
Customer Number.
8. Click Link and then click OK.
Resolution 2: Verify the lookup fields exists for only one object.
1. Log into Dynamics GP as ‘sa’.
2. Go to Tools | Setup | SmartFill | Repository.
3. In the Search field, type in the Field you are using.
a. For example, Address Code.
4. Verify the Address Code field exists for only one object. If it exists for more than one, determine which object you want on that field and delete the other through the Lookup Wizard.
5. Click the [+] symbol and in the Lookup Creation Wizard, click Next and select the object.
6. Open the window where they field is located, click Remove Lookup, and then click Done.

Resolution 3: Re-add the mapping entries.
1. Log into Dynamics GP as ‘sa’.
2. Go to Tools | Setup | SmartFill | Objects and click Actions.
3. Click Import Field Mappings and click Add to or Replace.
4. Confirm the Mapping values did import correctly by opening the SmartFill Object (i.e., SOP Documents).
5. Place your cursor in the Calculated Field, then click the blue arrow.
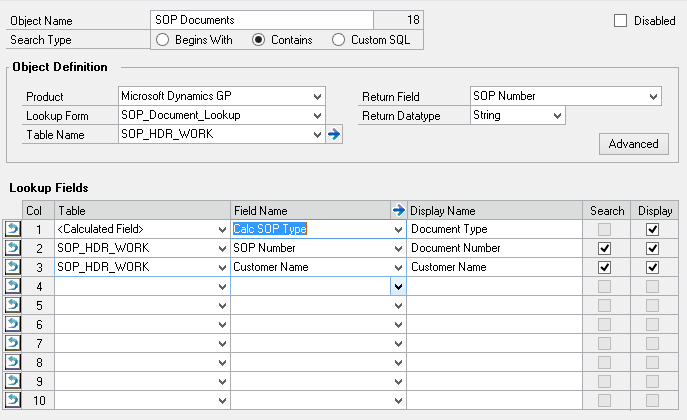
6. In the SmartFill Object Calculated Fields window, click the Mapping button to open the SmartFill Field Mappings window. You should see six fields listed.
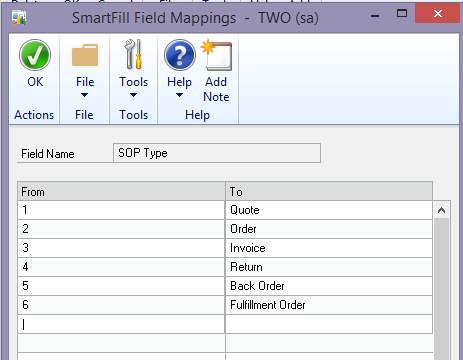
a. If you do not see them, please type them in, one on each line.
7. Click OK on each window to close out of SmartFill.